Preparing Your File for Printing
If you’ve got some knowledge of design, and you’ve been working on your project in applications such as InDesign and Photoshop, then you’ll have little difficulty getting your head around this guide to preparing your file for printing at Wakefields Digital.
Setting up your page
Page setup – InDesign and Illustrator
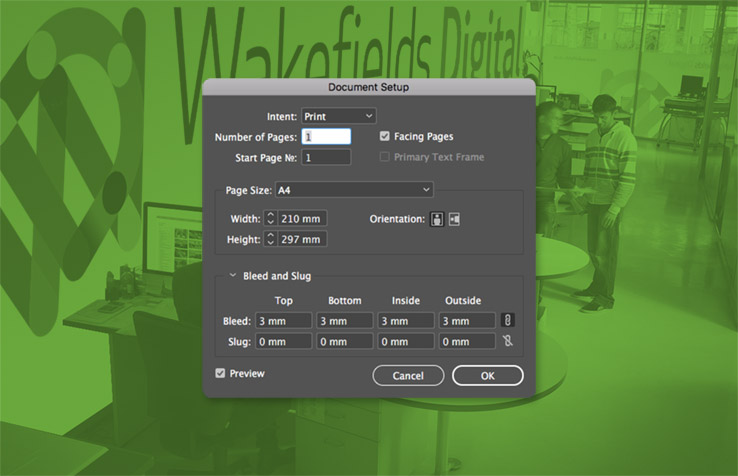
Page size: Check that you have set your page size to match the final printed size. Use whole millimetres.
Margins: A safety margin is to be considered when setting up your file. Margin set-up is dependent on your product. For example, if your document is wiro bound, you will need to keep all important design elements such as text clear from the binding edge.
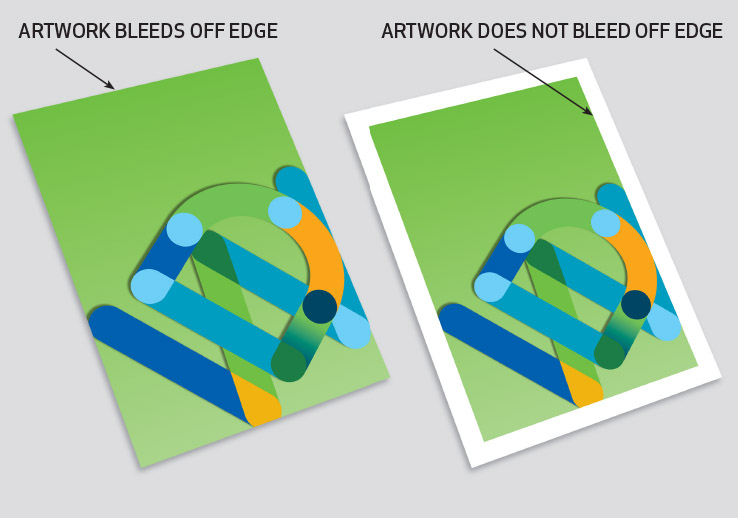
Bleed and Crops: When your artwork goes right to the edge of the page, or “bleeds” off the page, you need to add an additional 3mm of bleed to your artwork.
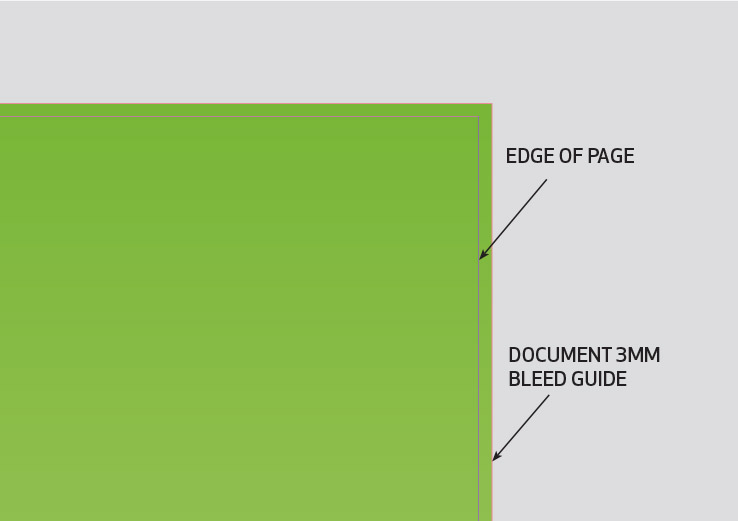
Make sure the artwork is extended to the edge of the bleed line (red line):
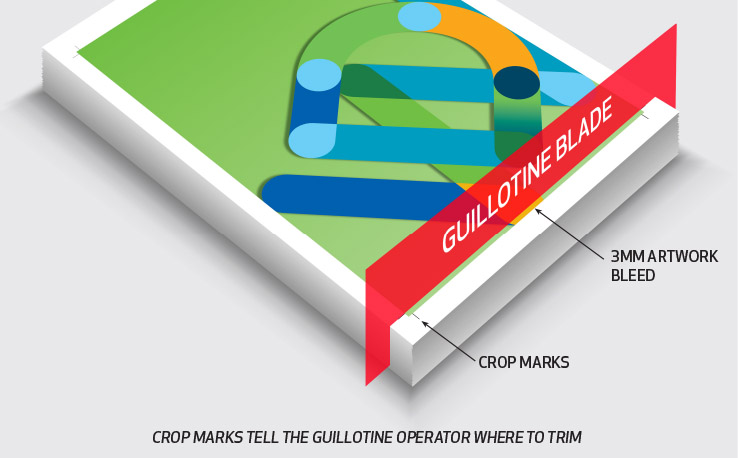
Correct bleed will ensure there’s no white edge if the guillotine cuts slightly off the crop mark. Crop marks tell the guillotine operator where to trim.
Preparing images for print in Photoshop
Image resolution: Ensure that your images have a resolution of at least 300ppi (Pixels per inch). Printing uses high-resolution images that are 300ppi to ensure that crisp, sharp images are reproduced.
There are two ways to determine if your images are sufficiently high-res for printing:
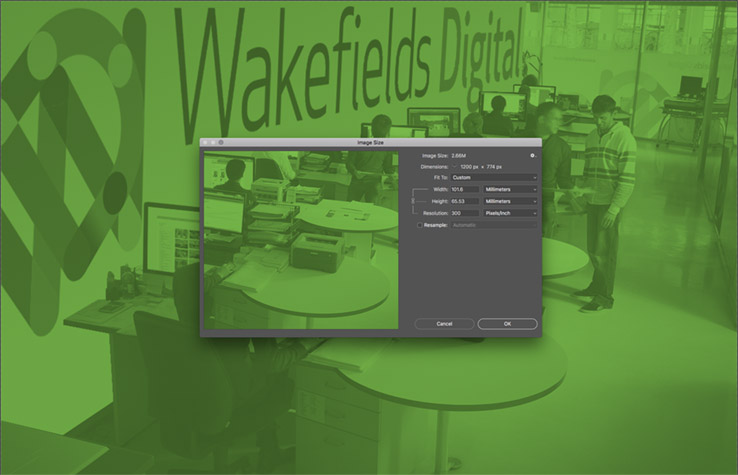
Method 1: Using Photoshop
Open the ‘Image Size’ dialogue box (Image/Image size). Change Resolution to 300 Pixels/Inch. Uncheck ‘Resample’. The results in the Width and Height fields are the dimensions your image is sized.
Method 2
Find your image dimensions in pixels by right-clicking the image and choosing Properties (PC), or Get Info (Mac). Divide the number of pixels in the image by 300.
The results are the dimensions your image is sized. For example, if you had a 1200px x 600px image, take 1200px divided by 300 = 4, and 600 divided by 300 = 2. Your image will print at 4 inches x 2 inches.
Setting the correct colours for printing
CMYK: For offset printing, all images should be supplied in CMYK. CMYK is a four-colour printing process made up of Cyan, Magenta, Yellow and Black.
PANTONE: Also known as PMS (PANTONE Matching System), Pantone is a colour matching system used in offset printing to ensure universal colour accuracy. It’s commonly used for printing logos and branded collateral for colour consistency. Professional brands are assigned specific PMS colours.
RGB: (Red, Green, Blue) is used for screen viewing. This system has a wider colour spectrum than CMYK. Our commercial digital inkjet printers can print directly from RGB, so if you are printing a fine art print or photograph, the file can be left as RGB. Sometimes a very bright, vibrant colour on screen cannot be reproduced by printing onto paper.
Raster vs vector
Perhaps the most common error we see in clients’ files are logos which aren’t formatted as vector, they’re supplied as raster.
Even worse, some have just been pulled from a website. Not only are these raster files, they are low resolution. It’s important to supply a vector logo for clean, crisp printing, and colour accuracy.
What are the differences between them?
Raster (bitmap): Made of pixels. Resolution dependent, e.g. photographs.
Common raster file types: jpg, tiff, png, gif, Photoshop PSD, bmp.
Vector: Made of mathematical calculations that form shapes. Not resolution dependent. Vector graphics can be scaled to any size without losing quality, e.g. logos, fonts, and solid shapes. Common vector file types: eps, ai (Adobe Illustrator), PDF, svg.
With vector files, you can select the separate elements of the logo and assign PMS colours. Rasterised logos are flattened and have minimal flexibility when it comes to editing them.
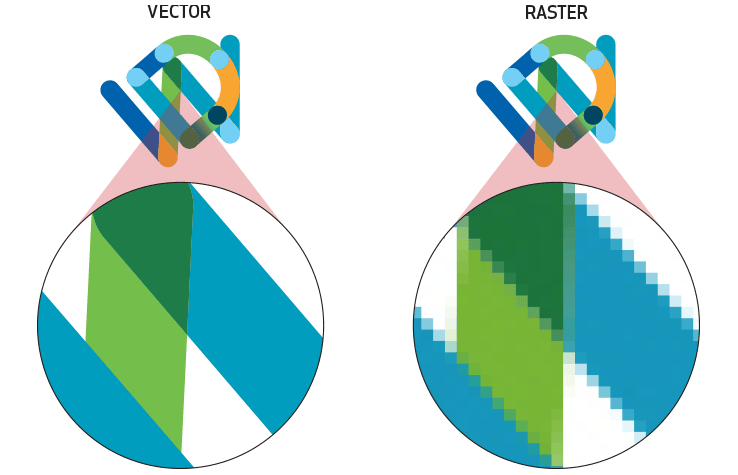
You can see the difference in quality when the logos are enlarged.
Binding and finishing
You need to know how your design will be bound/finished before you set up your file.
For example, if your publication is saddle stapled, your document needs to be set up as signatures (multiples of four), with enough margin for page creep. Or, perfect-bound books will need a larger inside margin because 4–6mm is lost when they’re bound.
File formats
In most cases, we require a print-ready PDF document to go to press. For multi-page documents, supply as single pages, not spreads or imposed.
When exporting from InDesign or Illustrator, use the Press Quality preset. Don’t forget to supply with 3mm bleed and crop marks.

Other common accepted file types:
Adobe InDesign package (zipped)
Adobe Illustrator package (zipped)
PSD (High resolution)
JPEG (High resolution, no compression)
TIFF (High resolution, no compression)
Microsoft Office: If supplying Word, Powerpoint or Excel files, the final product may differ from the artwork supplied. These are not professional design programs and can give unexpected colours and fonts may be replaced. The placement of objects and text may also be affected.
If you don’t have a working knowledge of design programmes, relax! Just contact us at Wakefields Digital for further help with your design and printing.